
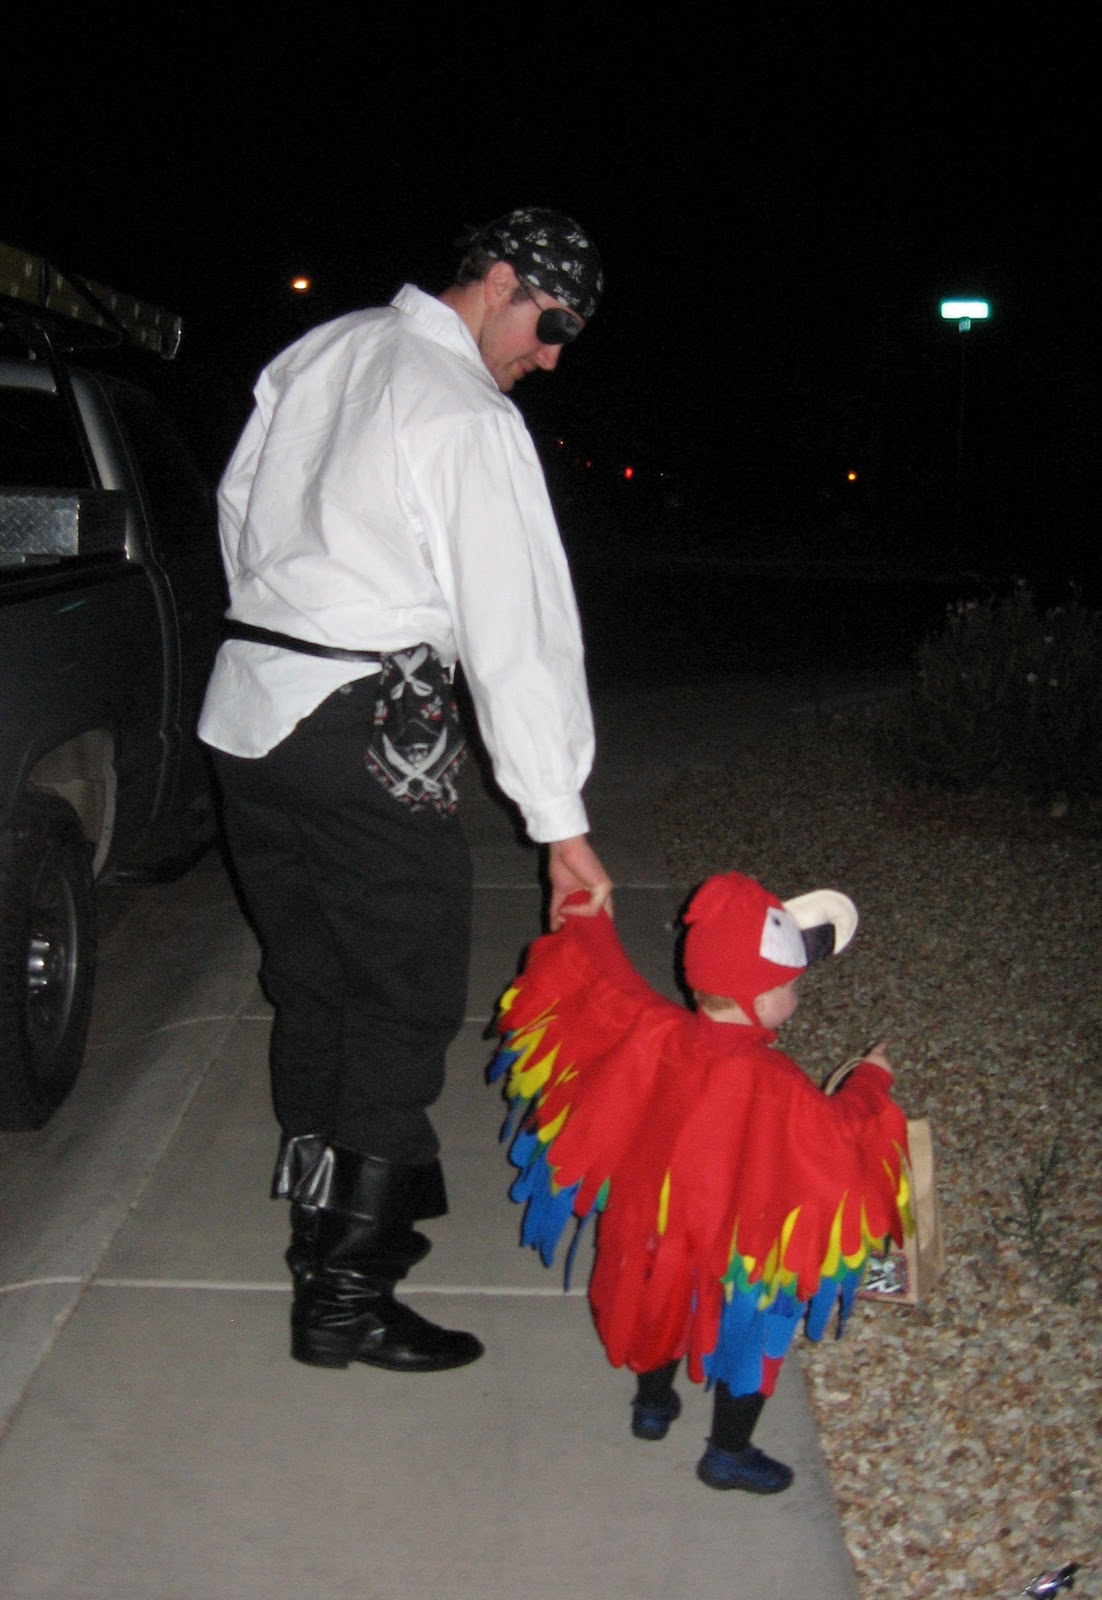
Since the family-themed costume post, I’ve had a few questions about how we made the parrot costume. We didn’t have a pattern–just a few ideas & pictures, then we just “winged it”. Sadly, this was in my pre-blogging days and I didn’t write down directions or do step-by-step pictures. So, here is a “semi-tutorial” instead…
To make your very own cute parrot costume, you will need:
- matching colored long-sleeve shirt (or onesie in this case), pants, and hat (I found the hat at Target & loved that it had the little fringies on top). You could totally use other colors too–green, yellow, or blue come to mind. But, we found red. 🙂
- multiple colors of felt (we had the light beige for the beak, black, white, red, yellow, green, and blue)
- a package of multi-colored feathers (optional, but I thought it made it look a little more authentic & fun)
- a small amount of stuffing for the beak
- small square of velcro for the wings
- scissors (to cut the felt, which was the most tedious part)
- hot glue
- sewing machine (or you could probably hand stitch)
- a black marker (for the eyes)
- a paper sack

The key for us was to try to make it look as close to the real thing as possible. So, we looked at several pictures to try to get it right (like this one I took at the zoo):

Here’s what we did (roughly):
- laid out the red felt on the onesie from the wrist to the middle of the back to determine the width for each wing. Then, cut the red felt accordingly. We made it so the wings would just slightly overlap in the back.
- then, cut the yellow, green, and blue felt so that everything was the same width.
- put the green felt under the yellow and the blue under the green–sewing each to the other (but, high enough up that the stitching would not be seen…in essence, the layer above hid the stitching).
- sewed those color layers (one big attached piece now) to the underneath side of the red. This was the only layer in which the stitching could be seen up close.
- with all layers attached, sewed the red all along the arm of the onesie (from the wrist to mid-back running along the top of the arm).
- repeated this for the other side (wing)
- then (the most tedious part), cut the felt to look like feathers….
- using a pencil, we lightly marked a wing shape along the felt that we liked, so I would have a rough guide for cutting. To make it look more like a wing, cut the “feathers” shorter at the wrist and leave longer down the back (for the tail).
- we cut the “feathers” far enough that they would move and look like feathers, but not too far that they would rip off from the felt.
- to be true to the bird, we cut the yellow & green layers a bit shorter, so less of that showed. And, the blue felt was left the longest.
- after both sides were cut to satisfaction, I added in some colored feathers to make it look more “bird-like”. I just hot glued those to the felt where I thought they looked best.
- the left side overlapped the right a bit, and we put a small square of velcro about midway up the wings so they would stay together a bit more.
So, here’s what the back looked like when all said and done:


The head was the most difficult part to figure out & “get right”. It took a few attempts at making beak and white face patterns on pieces of paper before we got the size and shapes right. You’ll know once it looks right. Then, once you have it on paper, then, trace your paper pattern onto the felt and cut. We hot glued down the white face sides and then made eyeballs from felt and hot glued those as well.
We just hot glued the two beak halves together and then stuffed the beak–the bottom of the beak needed to fan out wide, so we cut a sort of triangular-shaped piece out of the black felt. However, the black sides of the beak were just colored in with black marker. Then, the whole beak was just hot-glued onto the hat.

For the last detail, we decided that a parrot needs parrot food, after all, “Polly wanna cracker”! 🙂 So, was made his “parrot food” trick or treat bag using a paper sack, some printed out images, and a marker.


If you decide to make this, I would LOVE to hear about it and see your pictures! And, if not a parrot costume, then share with me what costumes you are making! 🙂
Linked to: *Fall Frenzy, *Halloween Traditions, *Eighteen25


21 Responses
Oh my gosh! This is SO cute! My son would adore this costume. I especially love the pirates he found to take him around. 🙂
Thank you so much for linking up to Theme Party Thursday. I hope to see you again next week.
-Jami
Beautiful! 🙂
SUPER CUTE!!!
That is so incredibly cute! Found you on the Halloween linky!
SO adorable and amazing, great job! (Love that you were pirates, too!) I voted for you over at "While He Was Napping"
I wanted to let you know… You WON the Halloween costume contest at While He Was Napping! Send me an email with your address and I will get your prize mailed to you! Congratulations!
Krista
whilehewasnapping[at]gmail[dot]com
Wow, what an amazing costume! I'd love to link to your tutorial from my Holiday craft site: http://www.allfreeholidaycrafts.com. Please let me know if that would be okay with you.
Thanks!
Rachel @ AllFreeHolidayCrafts
Love that you went as a pirate family and your parrot costume was so amazing. LOVE it and totally can visualize it in blue for my little Rio lover.
You are a very talented Mum and you have a very lucky family. Loved the “parrrot on the shoulder” look!
My 4 year old boy is completely into RIO right now! He was a pirate last year and has had difficulty deciding what he’d like to be this year and this costume is perfect!
That is so darn cute..love it..Would love for you to share at my “Creative Halloween Party”
http://jeana-marie.blogspot.com/2011/09/creative-halloween-ideas.html
Just stopping by to let you know that I have featured your project on Fun Family Crafts! You can see it here
http://funfamilycrafts.com/parrot-costume/
I have been looking for a parrot pattern for my 3 year old. He wants to be blue from Rio. This is perfect! Your son looks like he had a wonderful time that night!
Excellent! I’m so glad you found it! We LOVE this costume–it’s been used for both our little guys now! 🙂 Hope everything turns out well for yours!
I am soooo thankful to have found your page! We have two boys (almost 3 and 1.5 year old). The older one is going through a pirate phase — so Halloween costume and birthday party are all pirate themed — hence why we needed a great parrot costume for little brother. This is the BEST homemade parrot costume i have seen. The detail of the beak is amazing — Thank you so much for the ideas and inspiration.
… and fingers crossed for a better Halloween than last year (our little “bowl of skettie” was NOT happy)
Awesome, Brooke! I’m so glad to hear that! Our boys were both 1.5 years exactly when they wore that costume! 🙂 Good luck and let me know if you have any questions. I know it’s not the best tutorial since I don’t have step-by-step pictures (dang for doing things before blogging, lol!). Hope it’s a big hit!! 🙂
Thanks for the idea!
http://i40.tinypic.com/jabf2e.jpg
http://i43.tinypic.com/fxwa50.jpg (http://tinypic.com/r/fxwa50/5)
Awww, Sue! Thanks for sharing! It turned out awesome!!! 🙂