Are you gearing up for Halloween yet? We just started pulling things out this past weekend! One of October’s Lowe’s Creative Ideas blogger challenge options centered around DIY Halloween lawn decor. So, we couldn’t resist having some fun with this one and ended up building a GIANT front yard spider and spiderweb! The boys are quite excited about our new spooky spider friend! 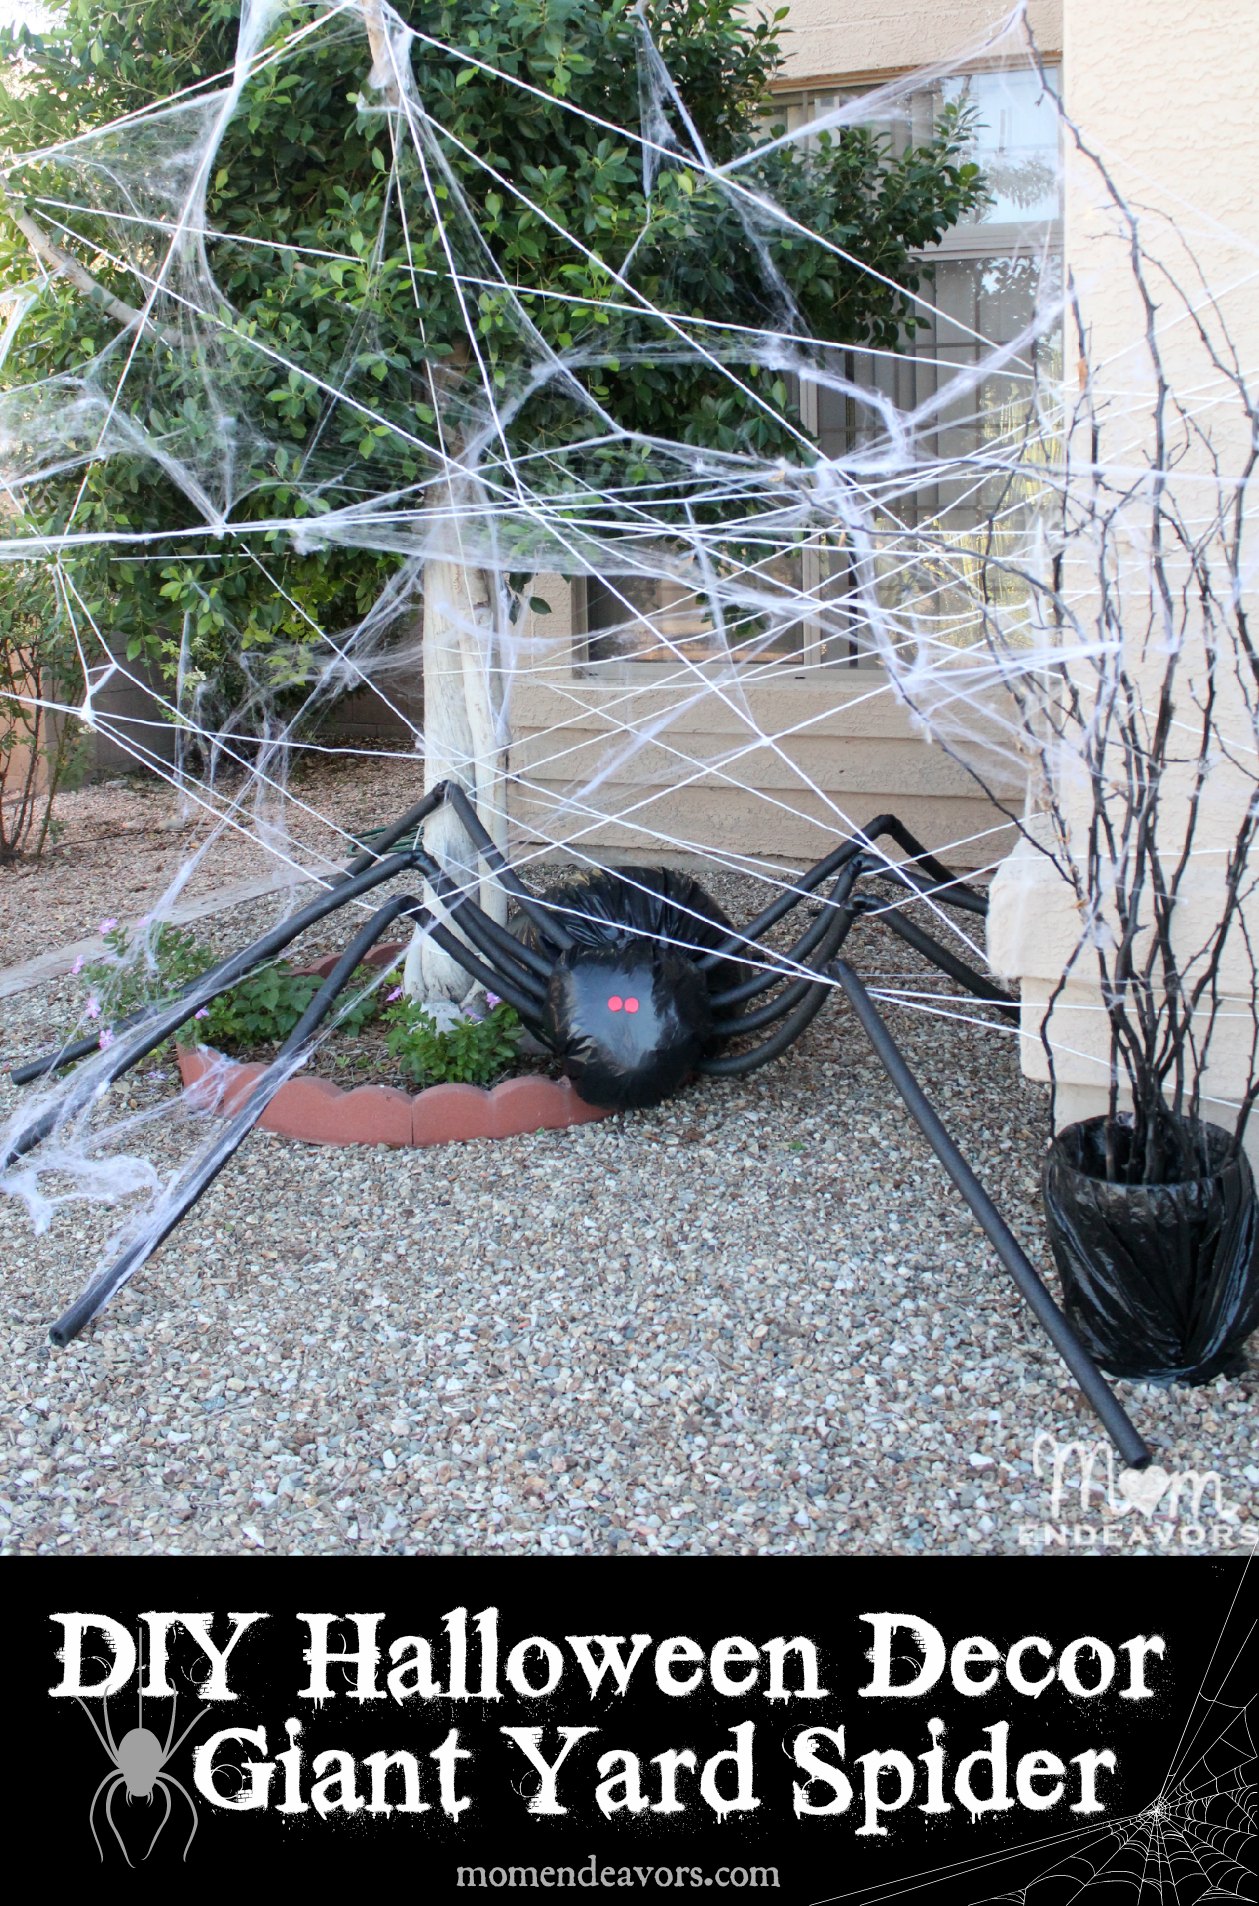 If you’ve been a reader of the blog for a while, then you might know that I seem to have “a thing” for decorating with spiders at Halloween. There’s the spooky spider wreath (which is SO easy to make), spiderweb pretzel snacks, spider display trays, spider cheeseball, and now our giant lawn spider! For a family with little kids, I think our spider is just the right mix of spooky and fun!
 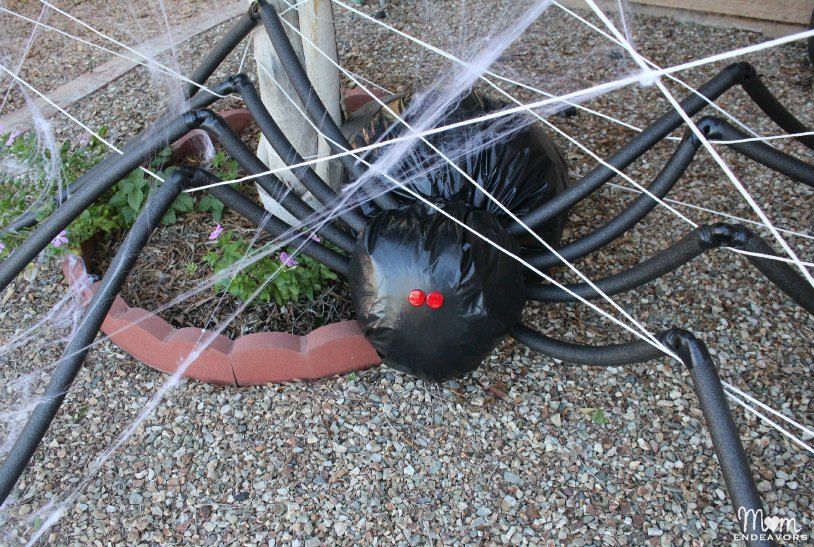 To make a giant spider of your very own, you just need a few supplies from Lowe’s and some patience in putting it all together! Here’s what you’ll need:
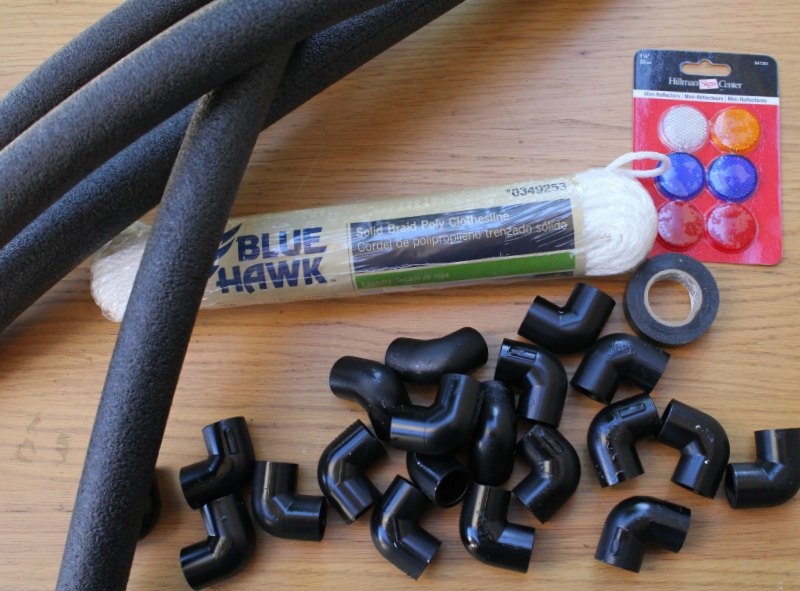
- White Poly Clothesline (we used 3 of these 100′ packs)
- 8 tubes of 1/2″ Pipe Insulation
- 8 1/2″ pvc elbow joints (we just bought a contractor pack)
- 2 mini red reflectors
- black electrical tape
- black spray paint
- two large black trash bags
- filler (old sheets, newspaper, plastic bags, etc)
- scissors
- *Optional – prepackaged spider webbing
- Unless you can find black or gray elbow joints, you’ll want to spray paint the elbow joints black before building your spider. (Yes, there are more than 8 pictured. We did some extra and had some in mind for another project). We did the spray painting the day before building our spider.
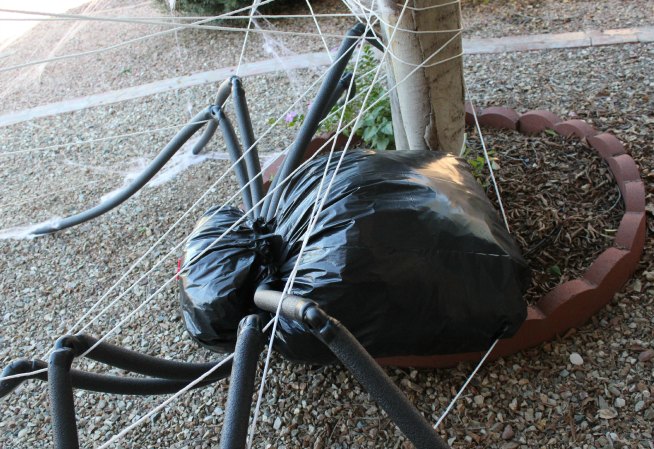
- For building the spider, you’ll start by stuffing one of the large black trash bags. The first thing I did was tape the corners in so that the bag had a more rounded appearance (more like a spider’s body). Then, we started stuffing. The bigger your spider, the more stuffing you’ll need. You can really use anything you want as long as it gives you the look you want. Ours is stuffed with a mix of plastic grocery bags and old sheets that we use for covering our plants during the winter).
- Once the bag has a nice round shape and is mostly full, tie off the bag (or tape it). But, leave the top of the bag loose (you’ll fold that back on itself for the legs).
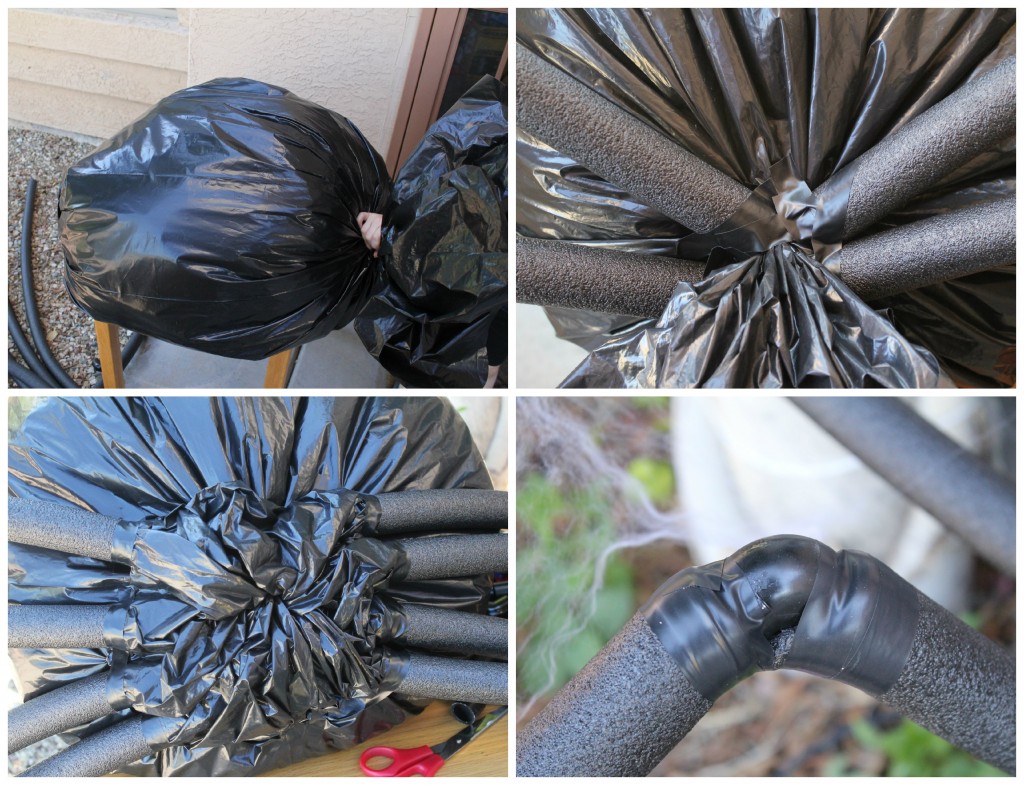
- Spiders legs attach off of their cephalothorax, so you know the biology teacher in me had to keep that as accurate as I could! 😉 So, once the large bag (the spider’s abdomen) is stuffed, we started attaching the legs (the pip insulation tubes) to the front end of the bag (what was the open end) with electrical tape. No need for perfect or fancy here, you won’t see the tape! Use the remaining ends of the plastic bag to fold over and tape down over the attached legs. It helps hold the legs in place and actually makes it look a little more real! 🙂
- To make the legs jointed, cut a slit in the top of each pipe tube (we didn’t cut all the way through). Then stuff the elbow joint into the opening. Ours didn’t fit exactly so we taped over the edges to make sure everything stays in place.
- Now you need a cephalothorax (head) for your spider. So, stuff another garbage bag with filler, but keep this one smaller (and don’t use anything heavy otherwise you’ll have trouble keeping it on). We used one of the boys’ light-weight balls with some plastic bags. Cut off any major excess to the bag and attach over the leg attachment area. We did this just with electrical tape. If you get right up close, you can see that the attachment isn’t beautiful, but for Halloween lawn decor, I think it’s completely fine. Here’s a side view so you can get a size perspective (and see that the cephalothorax attachment is by no means perfect).

 Once the head is attached, then all that’s left is giving your spider eyes. Now, technically, most spiders have 8 eyes –yes, really! But, we kept things simple with just two (I think it looks a little less creepy that way). We used stick-on reflectors for the eyes, which I think is a fun touch. When they catch the light right, it adds to the spookiness!
 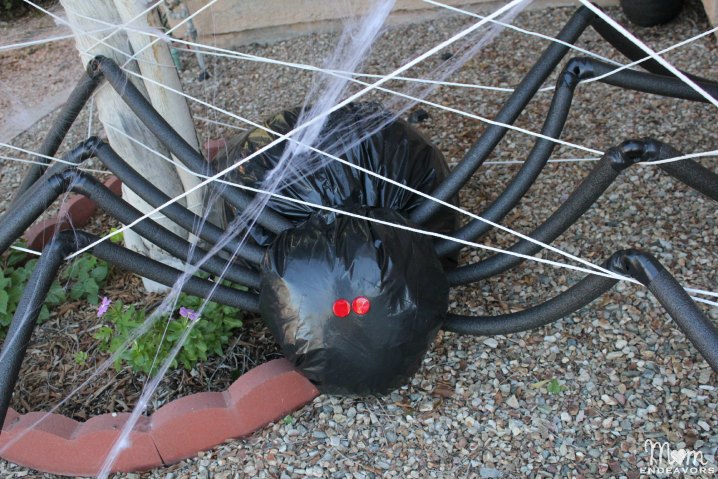 One of the trickiest parts of the spider is getting the legs to behave the way you want. If you added dowels or pvc pipe inside the insulation, that would certainly be helpful. But, it also makes it more expensive. So, since we wanted to have our spider in a giant web anyway, we just strategically placed rope for the web in places that could help hold the legs the way we wanted them to go.
  Making the web itself is a fairly easy process. You can make it as intricate and spider-like as you want. Or just go wild with it (which is what we did, especially with having the boys help). How you set it up and how much rope you need will obviously depend on your space. For our space, we ended up using 3 packages of the poly rope (about 300 feet). You may need more–or less! But, either way, I think having a giant web really helps add to the look of the giant spider!
 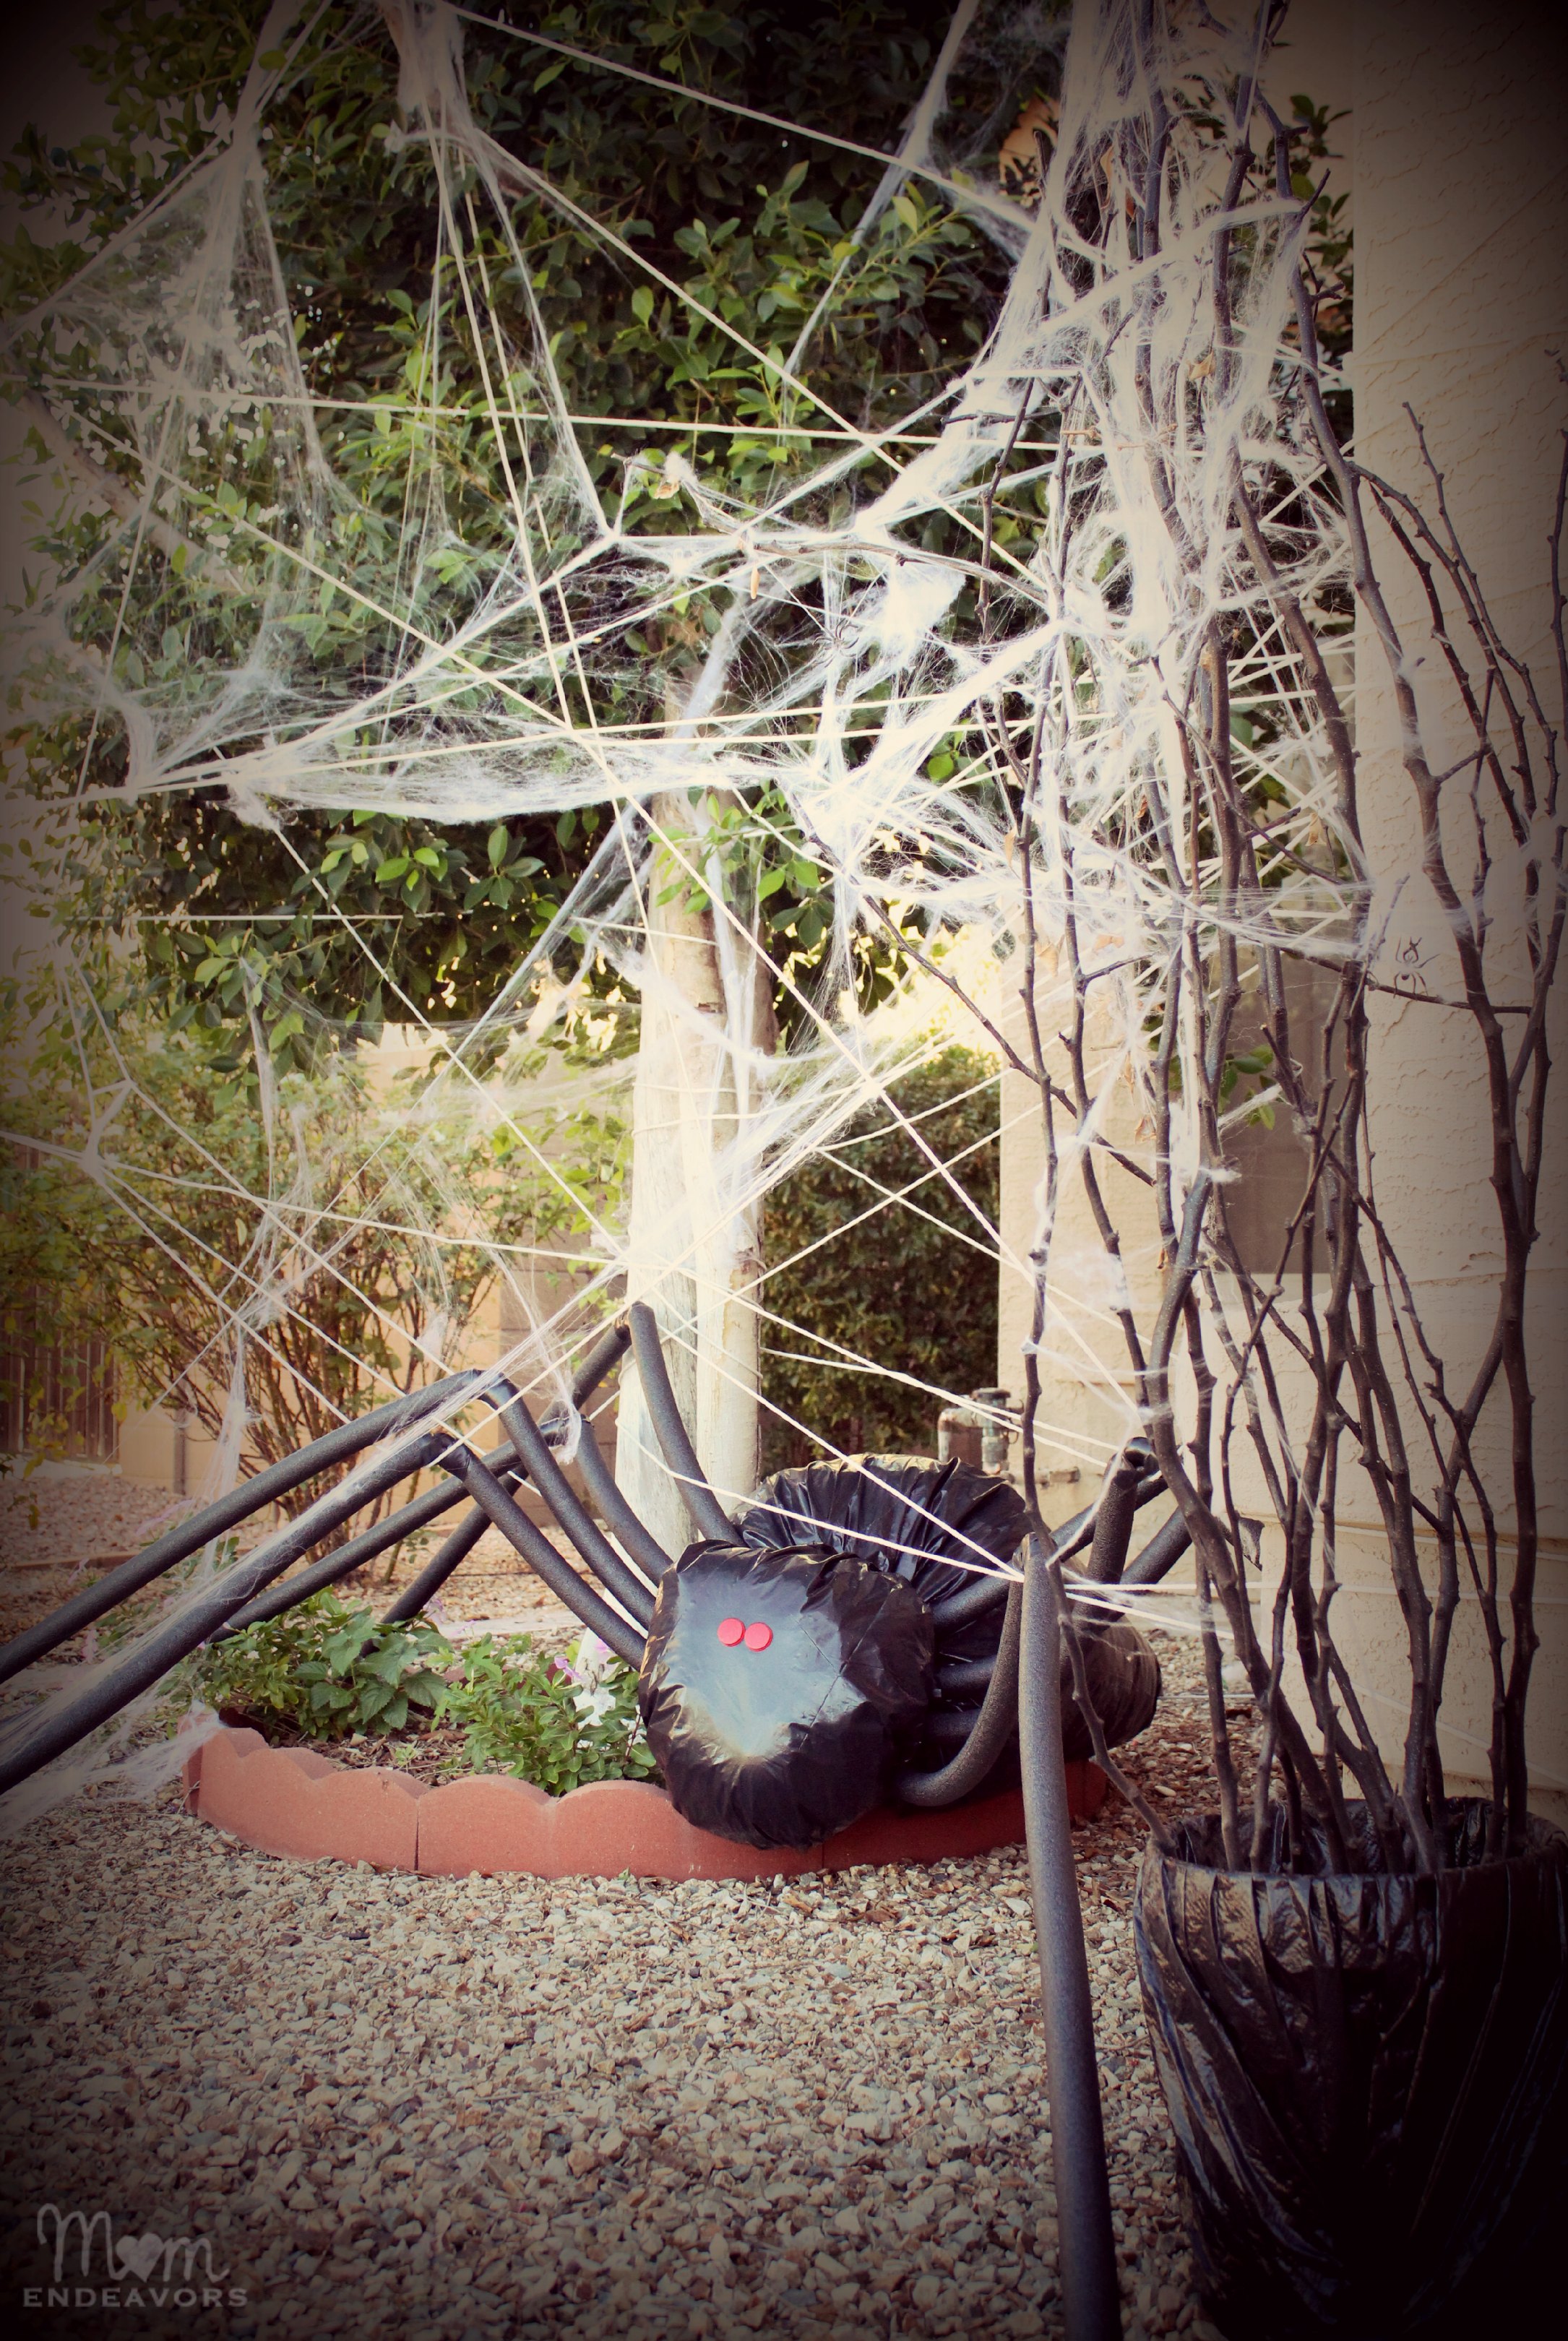 Spooktacular spider fun! I love look of it with our “spooky tree” there too (the spooky tree is another SUPER easy & inexpensive DIY project)!
Do you put any Halloween decorations in your front yard?
For even more ideas, visit Lowes Creative Ideas and follow along with Lowe’s on Pinterest or on Instagram! You can sign up to receive their free Creative Ideas Magazine, which is full of all kinds of ideas & inspiration! There’s also a magazine app so you can have inspiration on the go! ![]() Disclosure: I am a member of the Lowe’s Creative Ideas Creators & Influencers Network and receive a Lowe’s gift card to complete my projects. However, all ideas, opinions, & experiences are entirely my own.
Disclosure: I am a member of the Lowe’s Creative Ideas Creators & Influencers Network and receive a Lowe’s gift card to complete my projects. However, all ideas, opinions, & experiences are entirely my own.
Linked to: *Flamingo Toes, *Link Party Palooza


12 Responses
He’s HUGE!!
Oh my gosh – that is so great! I love it (even though I’m scared of spiders)!
Oh my gosh…that is awesome!! I’d love a giant spider in our front yard!! (But only this one…and only for Halloween!)
That is pretty awesome and I hate spiders..but that is fabulous!
What an awesome spider, I love the size too!
WOW, that is one BIG spider. Love the web and reflective eyes. YES we do put Halloween decorations in the front yard.
I love this guy – he’s so awesome! Desert spiders are especially scary! 😀
Very creative! Spiders freak me out even when they’re minuscule…so this definitely would have me shaking in my boots to see in person! Perfect for Halloween!
Love it Love it Love it! This has my husband’s name all over it – he would jump at the chance to make that spider!
I love this idea, sure beats spending a lot of money on one that will possibly get stolen , thank you for the idea
These are so cute, thank you for adding them to a Round Up post put together by Sara Lehman as it allowed me to share this with my readers. Also, I conduct a Homeschool Bloggers Shout Out on Monday if you would like to be featured Please let me know. Have a Blessed weekend.