Cornucopia of Creativity: DIY Fall Flannel Pumpkin {The V Spot}

This post may contain affiliate links. Privacy policy.

Facebook
Twitter
Email
Pinterest
Hi Mom Endeavors readers!  I’m Vivienne and I write a blog called The V Spot. On my blog I have lots of home projects, crafts, cooking and funny stories, (usually about my 4 boys.)  Fall is my favorite time of year, so I always have something crafty going on.  
I love pumpkins…  And I love plaid…  And I love Sara…   So when Sara asked me to share a project for Thanksgiving, I had just the thing.  Even though I made this flannel covered pumpkin last fall, I still love it, and thought I’d share it with you today.
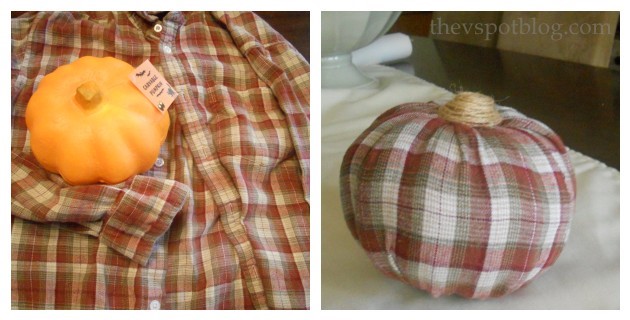
It is very easy to turn this cheesy Dollar Store pumpkin into a warm and cozy looking plaid flannel pumpkin.  You will need:
  • cheesy, fake pumpkin
  • old flannel shirt
  • floral pins
  • glue gun
  • jute
It was pretty darn easy and was absolutely cheap to do.  I got the shirt at Goodwill, and you can get the floral pins at any craft store.  If you don’t have any, you can use hot glue, but I think the pins work better, due to the bit of pleating and folding you’ll be doing at the top of the pumpkin.

1. Gather your materials. Grab some twine or rope to cover the stem, and cut the fabric into three strips.  I’m not going to give you measurements… just eyeball it.

2. I needed 3 pieces to cover the pumpkin. Make sure they are long enough to cover the bottom of your pumpkin and then some.  You can always trim it up later.

3. Sort of pleat the fabric around the stem of the pumpkin.  You should be able to push the pin right through the pumpkin.

4. Take the next piece of fabric and slightly fold over the edge so that you have a finished looking edge.  Secure it on the next third of the pumpkin, making sure it overlaps the first piece of fabric just a little.

5. Kindly ignore the messy nail polish and the fact that I’m way over-due for a manicure. Fire up your glue gun.

6. Play with the fabric a little, pulling it down to the bottom of the pumpkin and make little pleats there.  You want the fabric to be pulled tight down the sides, and not loose or puffy anywhere.  When you figure out where you want it, go ahead and glue into place.  Trim fabric after each section is glued down.

7. Carefully glue your twine in a circular fashion, so that the floral pins are covered and the stem is covered.

That’s it.  

Just a couple of bucks and you have a sweet flannel covered pumpkin!  Cheap and easy!
You can visit me at The V Spot… and on Facebook, Twitter, Pinterest, Google+ and Instagram.

Explore More

welcome!

I’m Sara, a mom to three adorable boys living in the Arizona desert. As a former teacher, I love sharing my passions with others. So, have a look around for creative inspiration about cooking, creating, celebrating, traveling with kids, and more everyday mom endeavors!

DON'T MISS A THING!

Get freebies, new recipes, and fun ideas sent right to your inbox!

Looking for Something?

Search

2 Responses

  1. This is so cool. Would look great at my home! ANd so easy I could do it! THANKS for the tips, happy holidays, hugs…

Leave a Reply

Your email address will not be published. Required fields are marked *