After revealing the master bathroom upgrades last week, I realized I never showed you some of the fun things I made from when we painted over the summer. We opted for a beachy theme, so aside from the starfish art, one of my favorite things in the bathroom is the framed shell art I made:
 The project was so simple, yet creates such a nice effect in the bathroom area! And, in addition to looking pretty, they’re nice pieces of memorabilia, as everything but the sand dollars were found on our trip to Australia! So, this project is a great way to showcase some of your favorite shells from favorite vacations or places!
Here’s what you’ll need:
 – Inexpensive, matching frames (4 fit our space the best, so that’s what I used).
– a collection of sea shells (I experimented with a variety of styles, colors, and sizes before deciding)
– a couple of sheets of 12×12 scrapbooking paper that looked like beach sand
– Mod Podge & a paintbrush to apply it
– scissors (or a paper cutter)
– hot glue
Directions:
 – Start by experimenting with your shells & deciding which to use. This is the part that took me the longest! 🙂
– Remove the glass from the frames. Then, using the mat (or just the frame if there is no mat) for sizing, measure & cut the paper you need.
– Using Mod Podge, apply the paper to the inside of the back of the frame.
– Apply a bead of hot glue on the inside of the shells to help them stick (and I also did in the corners of the frame, to help the mat stick down).
– Let everything dry, put the frame back on, and voila…DIY framed shell art! 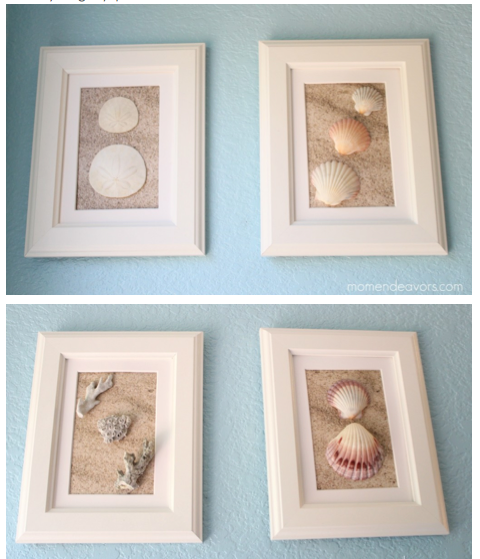
I LOVE the finished product! And, in addition to being quick & easy, one of the fabulous things about this project is it is so inexpensive. The whole thing cost me less than $10 (mostly just the cost of the frames). You couldn’t even buy 4 shell prints for $10, let alone 3D shell art! It’s the perfect decor for our bathroom!

Have YOU made anything with shells?
Linked to: *Tatertots & Jello


14 Responses
These are FABULOUS and I am Sooooo Jealous! A trip to Australia is my Dream Vacation. Someday *sigh* I sure wish Money grew on trees. LOL.
Have a wonderful weekend, hugs….
Thanks, Carol! Yes, it was the trip of a lifetime! But, the reason we went is because my brother-in-law lives there (actually, is now an Australian citizen). So, we went with my in-laws to visit him. 🙂
Here’s a few pictures: https://www.momendeavors.com/2011/02/our-hearts-and-prayers-in-australia.html
This was in my pre-Mom Endeavors days, so sometime I should do some posts about Australia! 🙂
You KNOW I love this project! Love the idea of the sand printed scrap paper too! Looks great!
Thanks so much, Kim! 🙂
So cute! When I first saw your pic I thought you had somehow glued sand onto the back of the frame, ha ha. They’re just lovely and add a sweet touch to your space.
i DO glue sand onto my pics! I pick out a pic, mat, and shadow box. i put the pic under the mat and lay out the sand and shells I want. then i take it apart and lay the mat on newspaper, smear a thin layer of glue, using a plastic knife, all over the mat and lay the shells first, then pour the sand all over it. I let it sit about a day. Then i glue the pic onto the bottom of the shadow box and glue the mat on top of the pic!
Sara this is so cute!! I love the look of that paper – it makes such a great background!!
Thanks, Bev! Yah-I loved that the paper was such an easy addition (and was a great use of all the scrapbooking paper I have stashes of)! 🙂
I wish I had collected some shells from previous trips to a beach, but I will start on our next one. The scrapbook paper does work well in your pictures. Now, to find some frames.
Have fun! 🙂 I LOVE collecting shells at the beach just like a kid. But, then never know what to do with them when I get home! So, this is a perfect project for that! 🙂
I love this!! We just got back from QL Australia. We didnt find shells this pretty. But I have 2 daughters I could make these for as Cmas gifts. I will just have to steal their shells. LOL
This is great!
Thanks, Michelle! You were in Queensland?! That’s where all these shells are from! 🙂 Some from the far north–like all the way up at Cape Tribulation and some from the Gold Coast! Have fun stealing their shells to make some gifts! 🙂
So pretty! You’ve got me longing for the beach even more than I was before! lol Gotta pin this one for my future beach house. ; ) I would love for you to stop by and link to my Sew Crafty Saturday Party!
found you through Tater Tots and Jello! From someone who lives by the sea, I want to tell you these look amazing. If you’re interested I have a link party on my site today and I’d love you to join it. Maria at http://caribbeanmissionarywife.blogspot.com/2012/03/t-time-67-and-link-party.html