Hi ya’ll! My name is Jennifer Rodriguez and I blog over at All Things Belle. I’m very excited to be guest posting today on Mom Endeavors. I’m going to share with you a project that involves quilting and free motion sewing. I hope after this fun tutorial you will stop by my blog for more sewing & quilting ideas!
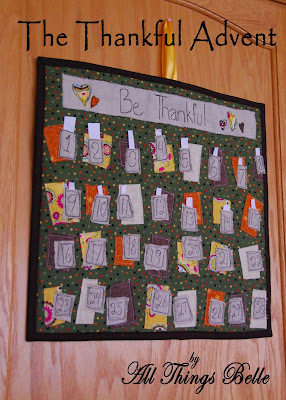
Today I will be sharing how to make my “Thankful Advent”. My kiddos & I love advent calendars. It’s a great way for them to learn numbers and better understand the concept of time. Coming off the heals of a candy heavy Halloween and with a chocolate Christmas advent waiting for December 1st, I really wanted to create a fun advent calender that had nothing to with treats and everything to do with..being thankful!
Thanksgiving is such a beautiful holiday that I sadly think is swept under the rug in the holiday rush. It is a great time to remember all the blessings we have and to take a moment to really appreciate it. With my advent you don’t fill it with treats or toys, instead each day your family will write what they are thankful for on a little note to place in each pocket. At the end of the month you will be amazed by all the wonderful blessings in your life. I think it’s a great way to start the Christmas season appreciating what you already have rather than what you think you want.
 Materials Needed:
 Materials Needed:
(2) Fat quarters of fabric
18″ square of fusible fleece
2 1/2 yards of double fold bias tape
large piece of soft burlap
scrap pieces of coordinating fabric
button
ribbon
Directions
1.) Cut the fat quarters into (2) 18″ squares.
2.) Choose which square will be your front and place the back aside for now. Cut a piece of the burlap into a 14″x2″ rectangle. You can either pin or spray baste it on to the top of the front square (seen below).
 3.)Iron on the fusible fleece to the back of the square. I used fusible fleece for this project because there is not a lot of quilting and I didn’t want the batting to move around.
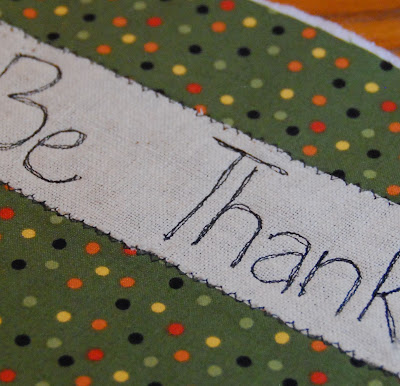
 4.) Stitch on your burlap title. I did a fun zig zag stitch – this also reduces the amount of fray that will occur. I then free motioned “Be Thankful” with some applique hearts. I have a real basic tutorial on free motion sewing here. I love doing it, but if it is more than you want to tackle right now you can write the words with a fabric pen or embroider it by hand.
 5.) Next you will cut 30 random sized rectangles from the scrap fabric. This will be the colorful placement of our pockets. You will then sew each little rectangle on to the fabric.
 3.)Iron on the fusible fleece to the back of the square. I used fusible fleece for this project because there is not a lot of quilting and I didn’t want the batting to move around.
 4.) Stitch on your burlap title. I did a fun zig zag stitch – this also reduces the amount of fray that will occur. I then free motioned “Be Thankful” with some applique hearts. I have a real basic tutorial on free motion sewing here. I love doing it, but if it is more than you want to tackle right now you can write the words with a fabric pen or embroider it by hand.
 5.) Next you will cut 30 random sized rectangles from the scrap fabric. This will be the colorful placement of our pockets. You will then sew each little rectangle on to the fabric.
*TIP – place a small dab of glue stick on the back of the rectangle before you sew them down. It will stop the fabric from shifting while you work.
*NO SEW ALTERNATIVE – Iron on heavy fusible webbing to the rectangles and then iron on to the top. This is not likely to need washing so the fusible webbing will keep the rectangles on without sewing a stitch!
 6.)Pin baste your advent top to the bottom – you want wrong sides together. If your top and bottom are not yet the same size, cut them down now.
 7.)Using the double fold bias tape, bind your advent as desired. Since this is a craft project I decided to machine bind it,but of course feel free to do it by hand if you prefer.
 8.)Free motion sew the numbers 1-30 on the remaining burlap. If you don’t want to free motion, you can embroider them by hand or use a fabric marker. Next you will sew the 30 pockets on to the advent calender.
**Be careful! Remember that these are your pockets – only sew the sides and the bottom. Keep the tops open! (See image below)
 9.) You’re almost done! On the back of the advent find the center and stitch on a large button about an inch down from the top. Tie your ribbon together and hang from the button.
 10.)Hang your super adorable Thankful Advent calender!
 11.)Each day take a moment with your children and spouse to appreciate the blessings in your life. Write them on a little note and place in the coordinating pocket.
 I think you will be amazed by how young children really understand and enjoy this activity. My 3 year old daughter never wants to just stop at one per day. It is important to find and appreciate the little things in our lives.
Thank you so much for spending this time with me. I would be so touched if you decided to make an advent & I would love to see it! I hope you will stop my blog, All Things Belle for more sewing fun! Thank you Mom Endeavors for this chance to share in this wonderful holiday. Wishing you & your readers a delicious and warm Thanksgiving!


One Response
Love it!!