While many of our friends in the midwest had a real snow day today, we had to make our own snowy fun with “snow paint”! I’d made the discovery for this inexpensive, easy & fun paint from the likes of Jenae at I can teach my child & Alison at Oopsey Daisy.
To make your snow paint, combine equal parts white glue & shaving cream! Easy, peasy!

Cut out various snowy shapes from card stock (I would definitely recommend a stronger weight paper, as the paint is rather wet). I did snowmen and snowflakes–there are some snowflake templates here. Then, let the kiddos glop & smear their snow paint all over.


The paint itself has a neat texture, but the really cool part about “snow paint” is that it dries puffy with this very velvety/cottony texture. The kids LOVE it!


We have all of our little snow paint creations (& some window clings) affixed to our patio door, to remind us it’s winter.

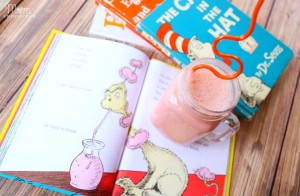
And, if you’re doing a winter-theme unit or whole indoor snow day, then I suggest making (& eating) some snowflake pretzels…

…and reading one of our favorite winter books:

What are some of your favorite snow-theme crafts/activities?
*Linked to: Tot Tuesdays, Show & Tell, Tidy Mom, Preschool Corner, Serenity Now, Tatertots & Jello, A Mommy’s Adventures, Craft Schooling Sunday, Sharing Time, Show Us Your Best, Skip to My Lou, Hodgepodge Friday


43 Responses
Cute, cute, cute!! Little Man LOVES Snowmen at Night!!
Thanks for sharing – I'll have to try this with my boys!
Just stopping by to let you know that each Friday we'll hold weekly linky under the name "HIGH PAW – show us your best!" and anything toddlers related is welcome! 🙂
You can add your ideas to last weeks linky here: http://best-toys-for-toddler.blogspot.com/2011/01/high-paw-show-us-your-best.html
What a wonderful project! I saw the pretzels at Make and Takes last week. So fun!
Wow ! How cool – I am bookmarking….
Hello!
Found you on a blog hop and am your newest follower – Would love for you to check out my blog and follow back if you like it.
Check out my "retail therapy" giveaways and enter a few, there are some great products to win.
I also have a fantastic weekly blog hop.
http://retailtherapylounge.blogspot.com
Carol
Featuring this post on this week’s High paw linky! Thank you for participating anf make sure to stop by and add your new posts to this week's linky: http://best-toys-for-toddler.blogspot.com/2011/01/high-paw-show-us-your-best_14.html
What a pretty craft!! 🙂 I love the snowflake pretzel idea too…yum! Thanks so much for linking up with me!
I hopped over from Amanda's Weekend Bloggy Reads Linky Party to give you some blog love!!! I think the snow paint is a super idea (may just snag this one for a craft project around here!). Thanks for sharing!
Those snowflake pretzels are adorable! Love all your fun ideas. Have a warm and cozy weekend!
I love how the snowflakes turned out!! We will definitely be doing these soon! (stopping by from Preschool Corner)
Very cute! We had a snow week, too! I love snow!
I love how this project turned out…the book looks really cute too.
I would love for you to join in on my stART linky. Each week people link up a story and an art project they did to go along with the story. This would be perfect!! We actually did snow paint this week too :0)
http://www.amommysadventures.com/2011/01/start-jacket-i-wear-in-snow.html
so cute!!! I need to try this!!! 🙂
Cute! What a great way to spend time with family!
Please come by and link this to my party!
http://WWW.TOOTSIEWOOTSIEBOUTIQUE.BLOGSPOT.COM
And i have a great Giveaway going one for ITHINKSEW.COM!
-THE TOOTSIE WOOTSIE 🙂
great idea, never heard of that one! Thanks so very much for sharing on Craft Schooling Sunday! Enjoy your winter, I see one doesn't even need much clothing! all the best.
Be careful, shaving cream is pretty strong stuff. It may bleach or damage your wood table.
Thank you for sharing; this looks fun! Is that equal parts by the volume of the can? (i.e. 8 oz. and 8 oz.) I’m not really sure how to measure shaving cream!
Wow, such a terrific idea!!
Thanks!
Just stopping by to let you know that I have featured your project on Fun Family Crafts! You can see it here
http://funfamilycrafts.com/snow-paint/
If you have other kid friendly crafts, I’d love it if you would submit them 🙂 If you would like to display a featured button on your site, you can grab one from the right side bar of your post above.
Love Snowmen at Night. My kids laugh every time we read it and the snowmen are all bent over.
I found you via playcreatexplore’s round-up. What a neat idea ! This is on our to-do list 🙂
Thanks so much for stopping by! It’s SUPER easy to do and the kids LOVE it! 🙂
Just a word of caution. I remember using shaving cream in elementary school to draw on our desks, clean our desks, etc. But after a teenager accidentally inhaled some of it during a game at a birthday party I attended and literally could not breath for a couple of minutes (it coated his trachea and he had a VERY hard time clearing it enough to be able to breathe again), I’ve been VERY leery of using shaving cream around children at all. All it would take is for a child to get it in their mouth and it might not have a very good ending.
Looking forward to trying the snowflakes. I’m thinking of adding glitter, either white or silver to the mix to see what it looks like!
What a great idea!
I’m a kindergarten teacher in search of fun new activities to do with our classes and can’t wait to try this in January along with our Snowman Unit.
Thanks!
Those are super cute!
It was very daunting to try to for the first time…but I did this with my Kinders today and they LOVED it!!! Will definately be one I repeat every year!!
Sara, have you found it necessary to put the shave cream and glue into the fridge overnight? Another site says it works better to do this. What is your experience or have you tried this?
Hi De – That’s interesting! I’ve actually never tried that, so I’m not sure if it’s better or not! Let me know if you try it!
this stuff is great for when children have to make diorama type projects. my grandson had to make a penguin rookery once. we put a base of randomly piled cotton balls in an oversized shoebox, then blobbed this on top as though we were icing a cake. we left a spot on the bottom of the box where he put some that had been colored blue for water. with the help of a hairdryer on low speed/warm it dried over night. he made penguins of craft pompoms for the body, felt for the feet and wings, and added google eyes. he made an A on his project.
a few yrs later, he had to make a castle with moat and again used this for assembling his structure. it looked like something out of ancient England, and again he got an A.