Calling all FROZEN fans…This DIY Kristoff costume is SO easy (and relatively inexpensive) to make!! It’s perfect for Halloween or just everyday dress-up play!
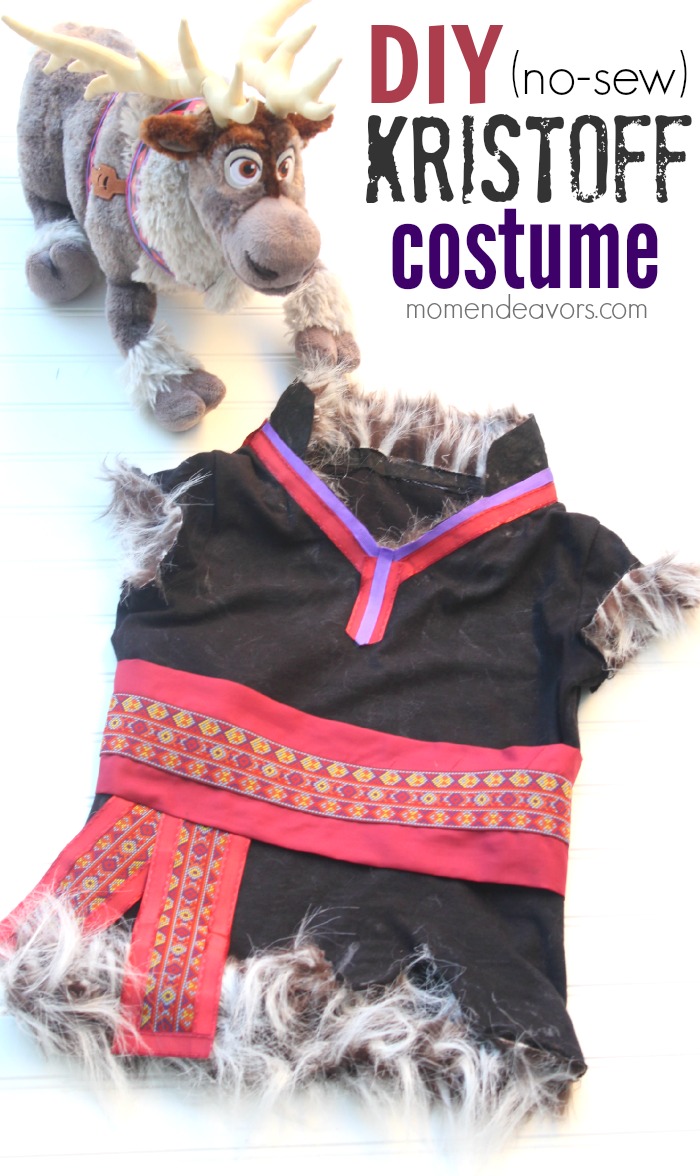 Have little boys who love Disney’s FROZEN? I do – in fact, I have 3 of them! And, one thing that is sorely lacking is FROZEN costumes for the boys! I’ve seen tons Elsa & Anna dresses (both to buy and DIY) and ample other princess gear. But, little boys want to dress up as their favorite characters too! I’d already made the boys Olaf shirts for their Frozen-themed birthday party. But, I’ve seen hardly any DIY Kristoff outfits out there so far, so I set out to make a Kristoff costume for Little Brother! And, I’m SO excited about the way it turned out. Most importantly, Little Brother absolutely loves it!! As I type this, he’s in costume watching the movie! 😉
  Sooooo cute! It took a bit of time to do, but really, there wasn’t anything hard about it at all! The whole thing is no-sew and the best part is that the tunic is just a t-shirt!!! It doesn’t get easier (or cheaper than that)! Here in Arizona a super warm, fleecy top would just NOT be doable at Halloween or even for inside dress-up play. So, I set out to make something a bit cooler and fairly inexpensive. And, for just a t-shirt and some embellishments, I think it turned out great!
  I spent less than $40 for enough supplies to make TWO costumes. So, you can definitely do this for around $20 (even less if you already have some of the supplies at home and/or make good use of those 40% off craft store coupons). Here’s the rough tutorial…
DIY Kristoff Costume Supplies:
- fitted black or charcoal gray t-shirt
- 1 sheet of black or charcoal gray stiffened felt
- 1 black or charcoal gray beanie/skull cap
- 1 large black pom pom (2″)
- 1/8 to 1/4 yard of fur (depending on how large the child is)
- 1/16 to 1/8 yard of maroon/dark fuschia fabric
- maroon/dark fuschia ribbon (I used 5/8″)
- purple ribbon (I used (3/8″)
- 1 to 1.5 yards of embellished ribbon
- velcro
- Heat ‘n Bond Ultrahold
- Iron
- hot glue
- scissors (fabric scissors are ideal)
- gray crayon (optional)
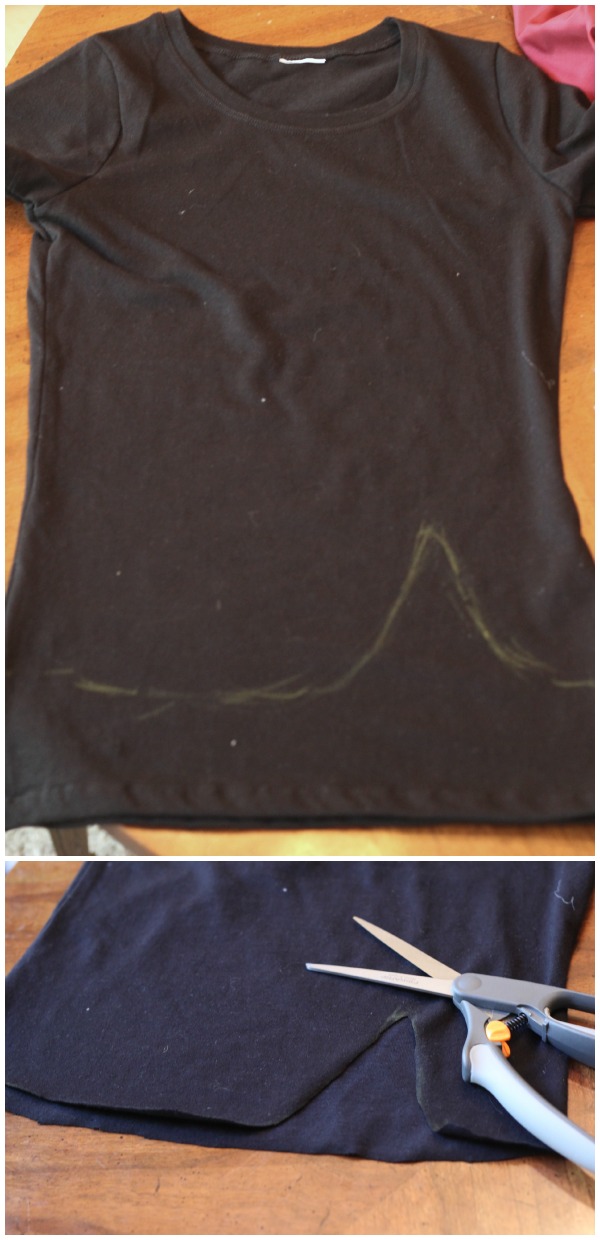 The first thing you’ll want to do is measure the shirt on your child and decide where you need to cut the bottom, the sleeves, and the neckline. Use a crayon (or fabric pencil) to make cut marks! The beauty of using a t-shirt (in addition to being inexpensive and no-sew) is that the jersey knit material doesn’t fray! For our 4 year old & 7 year old, I started with an adult small fitted tee (found at Hobby Lobby). The fitted tee already had a natural tunic-type shape to it, making it less baggy on the little guys! Once the basic shape of the t-shirt is ready, then add the collar.
 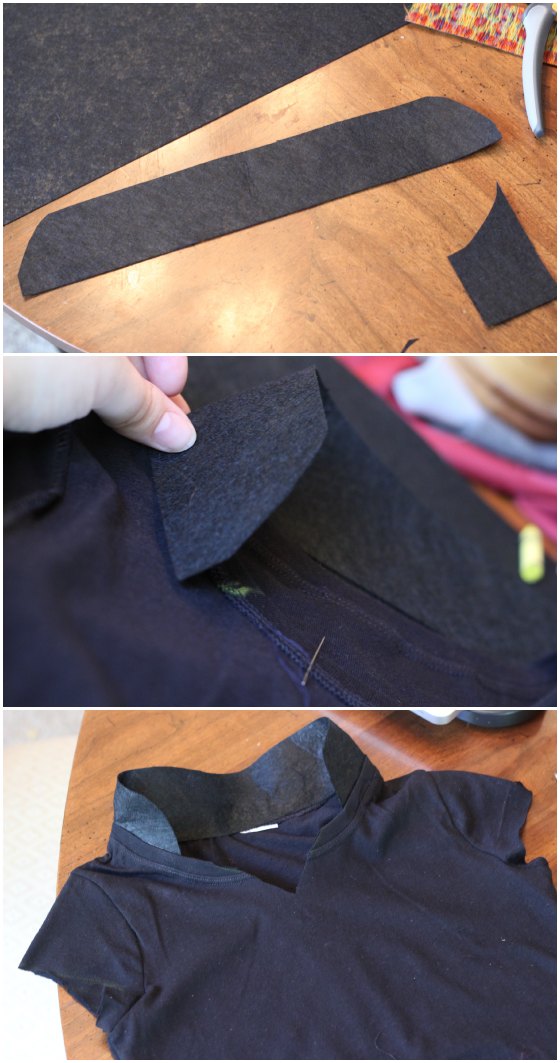 Cut about a 2″ wide strip from the lightly stiffened felt. Measure on your child approximately where the collar should start and mark the spot with crayon on the inside of the shirt. Using scissors, gently slope and round the front edges of the collar. Originally, I had started hand stitching the collar on. But, I quickly realized how much faster Heat ‘n Bond would be. To do that, flip the shirt inside out. Apply the Heat ‘n Bond to the bottom edge of the felt strip. Then, remove the Heat ‘n Bond paper backing and iron on the collar to the inside of the shirt collar.
 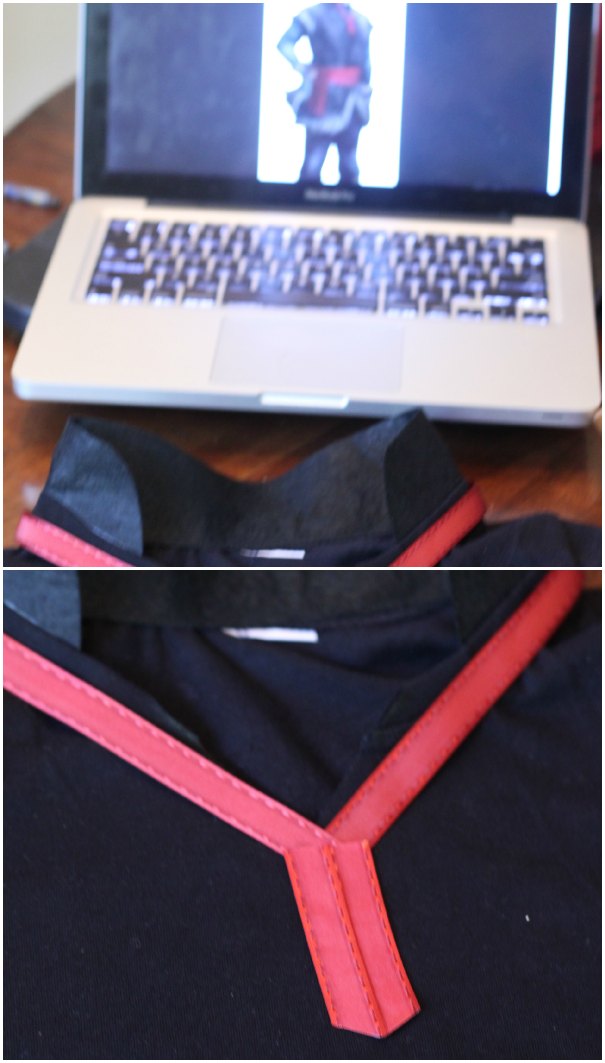 To do the details, I found it helpful to have an image of Kristoff there to look at (whether on the computer or printed). So, I used that to help me decide on everything. I couldn’t find any ribbon that was exactly right, but using two colors around the collar helped to make things look more authentically Kristoff. For adding the ribbon, I just used the Heat ‘n Bond again. The only thing remotely difficult about it was just cutting the Heat ‘n Bond to fit the small width of the ribbon. But, once that was done and the Heat ‘n Bond was applied to the ribbon, ironing it on to the shirt was SO easy. Do that with both colors and iron on the shirt (doing this also helps cover up the ribbed t-shirt collar). Once the ribbon detailing on the collar was done, I decided it was time to mess with the fur!
  Some sort of gray fur would be ideal. But, my options were rather limited. I decided on this one because I could alter the amount of “shaggy” I wanted and I liked that there was some different colors in it (sort of a brown, gray, and white color combination). No matter what fur you go with though, I highly recommend doing this part outside. Talk about messy – lots of shedding! Cut about 1 inch strips for the collar, the sleeves, and bottom of the shirt. Shape & trim the fur as needed. Flip the shirt inside out again and use hot glue to attach the back side of the fur to the inside of the collar, sleeves, and bottom of the tunic. If you find the fur isn’t staying, you could always tack down with a little hand stitching.
  Because I couldn’t find dark gray t-shirts, I decided to distress the black shirt a bit. This is totally not necessary, but just helps it looks a bit more like Kirstoff’s. To do this, I just used a gray crayon and colored right on the shirt. It didn’t take much time, but REALLY added to the look. I did the same thing to the hat too. Then, for the hat, I did do a hand stitch to attach the pompom to the top of the hat (ok…so technically that IS sewing. 😉 But…you don’t need a machine to do that. Just a few little stitches!
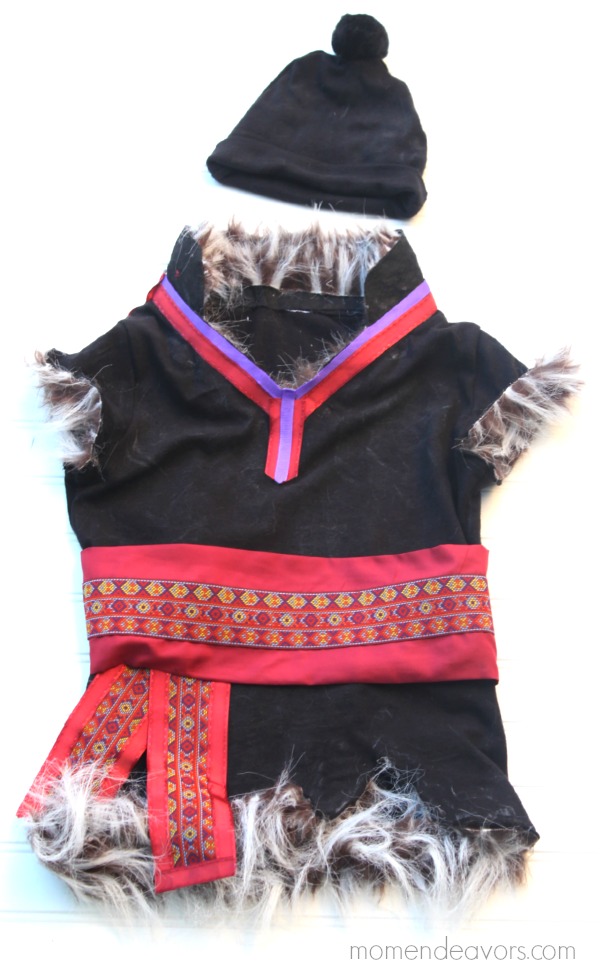 Lastly of course, you need the sash. Unfortunately, I got rather carried away and forgot to take pictures while I was making this part. But, it’s not hard at all. First off, I cut about a 5″ wide strip of my maroon-ish fabric. Then, I used Heat ‘n Bond to fold the rough, cut edges in on themselves on the back side. Then, I used the iron to really flatten everything out. For the front of the sash, I added Heat ‘n Bond to the back of the embellished/pattern ribbon and ironed that on. To save money/materials, I opted to not have that ribbon go all the way around the back (it just shows on the front & sides. You could use Heat ‘n Bond to attach the sash to the tunic. But, I decided instead to put velcro on the ends of the pieces that wrap around so it can be a bit adjustable (and removable). For the ties that hang down, I pieced together (using Heat ‘n Bond of course) the patterned ribbon and the maroon ribbon I used around the collar. Then, I hot glued the two piece to the underneath side of the sash. And, with that last detail…we’re done! Whew!
 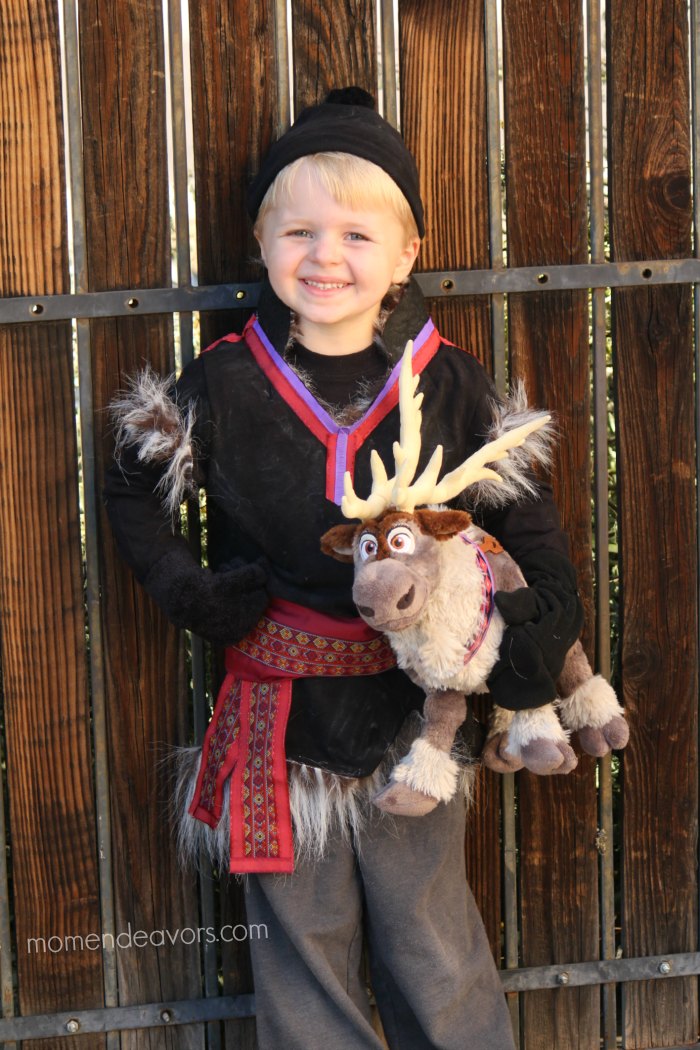 Then you’ll just need to decide on clothes for under the tunic. Kristoff’s outfit is really different shades of blue. But, we had a black long-sleeved shirt and gray sweatpants! So, that’s what we did. I think any shades of steel blue, gray, or black would look fine! I bought materials to make Kristoff’s gloves, but just didn’t have it in me right now. Little Brother had no problem raiding our winter wear draw (and chose two different gloves/mittens 😉 ). But, now he’s asking me to make him Kristoff boots – uh oh!! Ha! Even without the boots though, I think he still looks great!
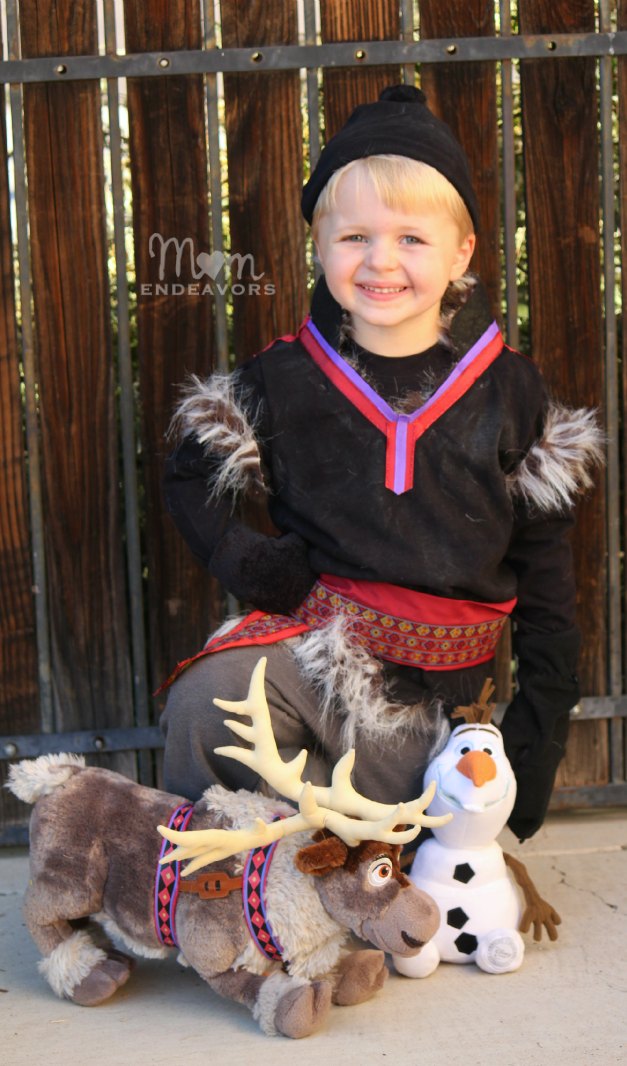 Sven & Olaf wanted to join in the fun too! 😉 We had so much fun with this. And, now…instead of another Kristoff outfit, Big Brother has requested a Sven costume! Good grief! We’ll see about that! I’ll keep you posted if that ever gets made. In the meantime, you can check out the whole list of 20+ DIY Frozen Costumes!
What character(s) from FROZEN would YOUR kid(s) love to dress-up as?
Like it? Pin it! 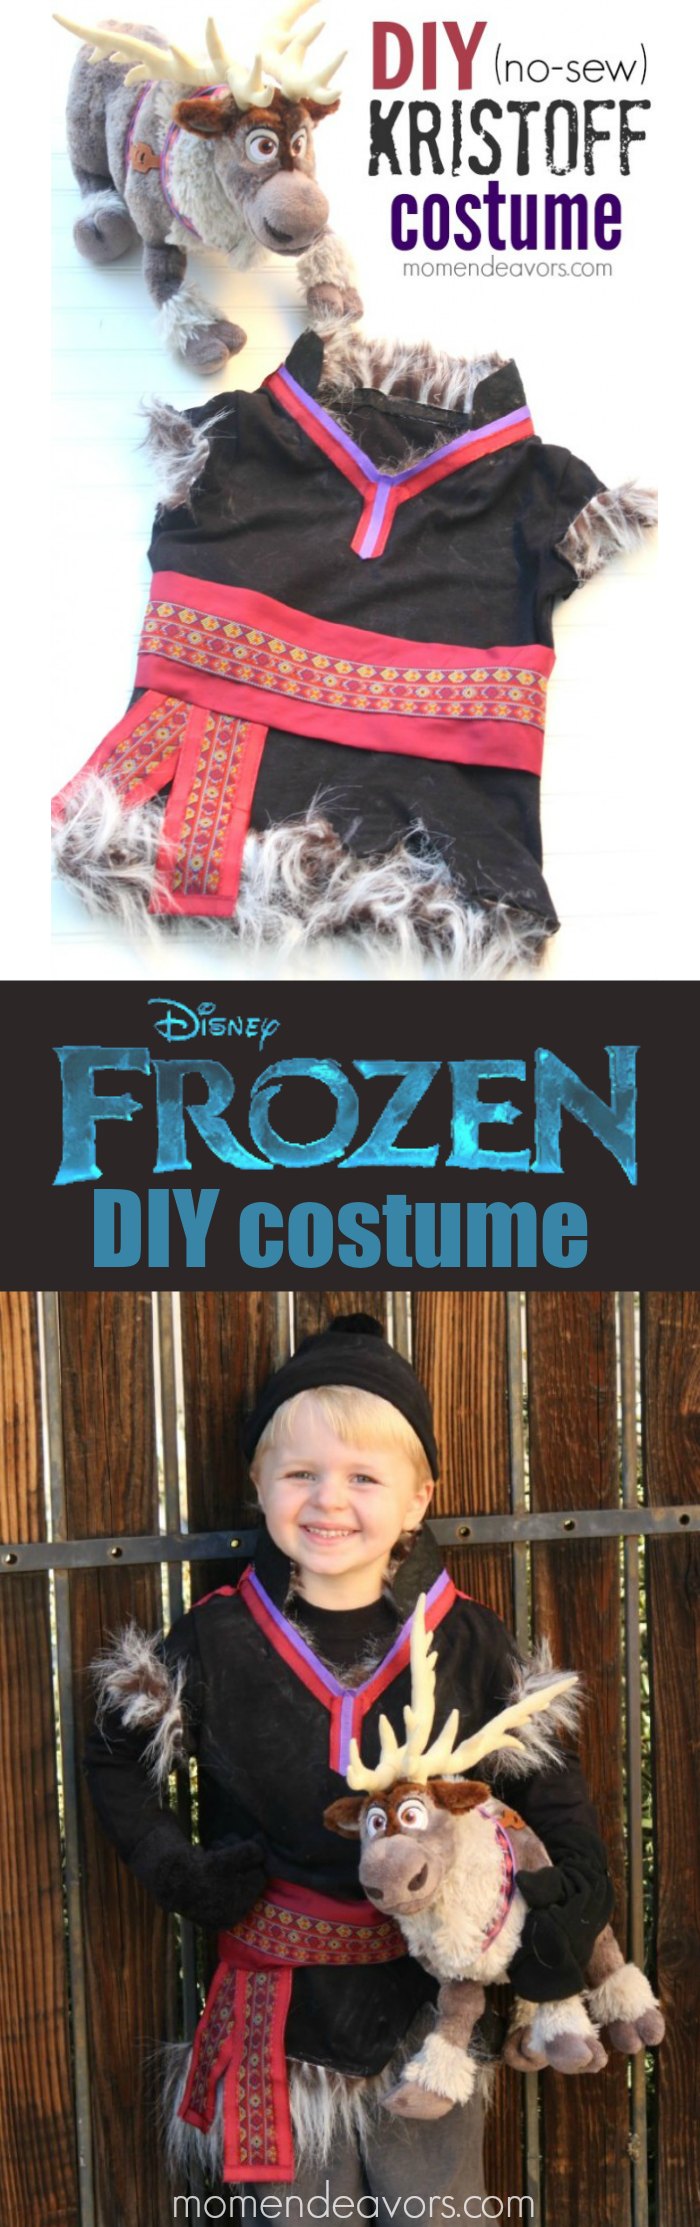


53 Responses
This is amazing! Seriously, looks just like Kristoff and so simple. Good job mom!
There’s a heat and bond for ribbon, too! Might save your fingers some 🙂
For someone that claims to not sew, this is amazing! Wow, good job!
Your costume and tutorial are incredible! And what a cute little guy you have! Thanks for included my Elsa dress!
oh my gosh it came out so cute!!! I love seeing costumes made for boys so they can join in on these Disney movies too!
ADORABLE!!!
This is so so so cute!!!!!! Pretty easy to do too with your directions.
This is soooo adorable! And I love that it’s no sew….I can’t sew!
Will you make these to sell? I don’t have a crafty bone in my body, but I would sure pay for one! 🙂
Hi Mary,
I appreciate the thought. But, unfortunately no. I’m just not able to make these to sell. But, I PROMISE that it’s doable! This is really just a matter of cutting, gluing, and ironing! 😉
OK, I’ll give it my best shot! 🙂
Hope you had success, Mary! I know I did 🙂 My eleven yr old liked my version so much he says he wants to keep it and be Kristoff again next year! I didn’t use the heat-n-bond tape though. Fabric glue and safety pins for me!!! Wish I knew how to post his pic for all of you to see 😉
Ha! I love that about your son, Dianna! Feel free to email me the photo momendeavors(at)gmail(dot)com or post on our Facebook page (http://www.facebook.com/momendeavors) if you want to share! I’d love to see (& share) everyone’s costumes! 🙂
This is AWESOME! We are doing a family Frozen themed Halloween costumes this year, so I need to do adult and young Kristoff costumes. Can you tell me where you found the fur? I’m having a hard time finding it in Florida.
Hi Ruth,
I found it at JoAnn’s. Any fabric store should carry some fur. I’m in Phoenix, so it’s equally hot here! 😉
LOL I am having a hard time finding it too! This came out so fantastic! I will be using this to create our Kristoff costume. Thank you so much for sharing this, it is the most helpful DIY and would never guess it was totally no-sew.
So glad you found it helpful, Stephanie! Thanks for stopping by!
Where did you find that ribbon (for the sash)?? I’m not having any luck finding anything remotely similar! :-/
Hi Naomi – I found mine at a JoAnn Fabrics store!
You must have different ribbons there. I looked @ Joann’s, Hobby Lobby & Michaels and like Naomi couldn’t find any ribbon that looked anything near to the one you have. 🙁
Bummer, Brenda. I’m sure the costume will still look great without that ribbon though! Good luck!
Thanks for the tutorial! I’m using it to make my husband’s costume! Our 6 year old decided we all need to be Frozen characters for Halloween!
That’s awesome Jackie! We almost went with that family theme too!! 🙂
I just made a kristoff costume for my son using your tutorial. It turned out amazing. Thank you so much 🙂
Yay, Tami! Thanks so much for taking the time to let me know! I’m so excited for you that it worked out and the tutorial was helpful! 🙂
Oh man thank you so much for this. Literally a life saver. My 2 year old geeked out when he saw the Olaf costume but me being the mother I should have followed my gut. The moment we put the costume on him he threw a fit and hated it -_- But we’re doing a family Frozen costume (not my choice but my daughters, I’m so over Frozen haha) so when I found this supper easy and cheap DIY for Kristoff I sighed some relief.
Hopefully I’ll find the fur, I live in Hawaii so I cant thank you enough for sharing this tshirt idea! I know that’s why my son hated the Olaf costume, it’s lightweight and all but it IS too hot, Idk what I was thinking.
I guess I secretly wanted him to love him because gosh darn he looked so cute as a tiny chubby snowman.
Mahalo!
Anastasia
What an adorable Kristoff outfit!! I think it’s the best I’ve seen, and you made it so easy! I liked it so much I put it in my round up of 5 easy, no sew Frozen Halloween costumes. Have a nice (chilly) halloween! http://fromwinetowhine.com/5-easy-no-sew-frozen-halloween-costumes/
Thanks, Deanna! 🙂
Thank you so much for taking the time to post this tutorial on your website. You had me at “No Sew!” I finished my sons costume just in time for our church truck or treat event. He spent part of the evening on the bouncy and the costume held up great.
Aww! Thanks so much for commenting, Wendy! I’m SO pleased to hear that! Glad everything worked well! 🙂
I used your tutorial to make my son’s costume this year. I’m so thankful that you shared your craftiness and skills online! The costume turned out so cute and was adorable on my 18 month old. The shirt I used had a little pocket so I made a carrot with felt pieces and hot glued it inside the pocket. Obviously, I had too much fun making this outfit! Thank again!
Thanks so much for sharing, Melissa! The carrot idea in the pocket sounds SO cute!!! Feel free to email me the photo momendeavors(at)gmail(dot)com or post on our Facebook page (http://www.facebook.com/momendeavors) if you want to share! I’d love to see (& share) everyone’s costumes! 🙂
I made this costume just as you demonstrated and my three-year-old loved it! He was a hit among 9 Elsas, 4 Annas, and 1 Olaf! And you’re right it wasn’t that hard. Wish it would let me post a pic here. Thanks so much!
Yay! That’s so awesome, Lisa! Feel free to email me the photo momendeavors(at)gmail(dot)com or post on our Facebook page (http://www.facebook.com/momendeavors). I’d love to share everyone’s costumes! 🙂
Hey there…..I have been meaning to post. I made this costume for my 1 year old this past Halloween and I got SO MAY compliments on it. THANK YOU so much for the inspiration and also for making it sound easy enough that I would actually try to make it. Our friends, their girls, my partner, son and I all did a frozen theme for Halloween this year. I even made a “sled” out of cardboard and attached it to our wagon. I’m going to do your Elsa Frozen trifle for my nieces birthday. Again so many thanks and if i can figure it out I will attach a photo:)
That’s awesome, Rachael! Thanks for commenting!!! So glad the costume worked out! You can share it on our facebook page! 🙂
I searched: “Kristoff Cosplay Pattern” and this is the first thing to appear! I love putting together cosplays for myself (it’s more fun and it saves money compared to just buying it) and I’m gonna use this as a guide to help me make my own! Thank so much for posting! The finished product looks great!
Wow, this turned out fantastic!! I’m going to attempt to make this for my husband for Disney World. Our family is dressing up in a Frozen theme for the Mickey’s Not So Scary Halloween Party when we visit in three weeks. I am having no luck finding the design ribbon on the sash. Where did you get the one you used? Thanks so much!!
Thanks so much, Megan! I found the ribbon at JoAnn. Good luck!
Oh my goodness, this looks quick, easy, and most of all it looks great! Originally I wanted to have my hubby and son match in a Frozen theme (we had found an Olaf costume for my 3yo, and I just finished getting all the pieces for my Anna costume), but we just cannot find a Kristoff costume of any kind anywhere! With days until Halloween, I just didn’t know what else to do, but thought I would do one more internet search and that’s how I got here. I think this could very easily adapt to an adult size with some extra materials, and most importantly I think I can easily get this done in time for Halloween. 🙂 Thank you so much for posting this!
Thanks for this guide. I just got done making my son’s costume. Two tips for others:
1- Flip the fur over and use a utility knife to cut it. That way you only cut the backing and not the fur. It is much less messy.
2- An easy prop is Kristoff’s rope . Just get some jute rope 3/8″ thick and 4-5 yard long. It looks perfect.
How can I make this warmer? It usually cold on Halloween here… My kids and I wore winter coats over costumes this year and we’ve had snow some years.
You could put a sweatshirt and long underwear under the tunic. You could also make the tunic out of a thicker fabric (like fleece).
This is great, thank you so much!
Thank you so much for this!!!! What a huge help! We’re going to a Ftozen Sing-a-Long and my kids wanted to dress up. Easy to find an Elsa dress not so easy to find Kristoff. I couldn’t have made one without this step by step. Thank you again!
Great idea. Your instructions were so helpful and I was able to adapt to make my husbands costume. Thanks!
Thanks so much! My 3yr old grandson wanted a Kristoff costume so much. His sister has lots of princess and frozen dresses. Followed your instructions, used my sewing machine for some parts, but it turned out great! He is so happy!!
My Granddaughter asked for a Kristoff costume for herself this year…and Olaf and Elsa for her two dogs, Sven for Daddy and Ana for Mommy! I can’t wait to see them all i my creations! Thanks for such a great costume and tutorial! I also sewed fur to a pair of sock she can wear with her boots, for the full effect!
My 3 yr old son is having “Frozen Day” at preschool and I made this last night (bought everything at Hobby Lobby). It turned out wonderful! Thank you so much. My son loves it. And he is the only Kristoff in a sea of adoring Elsas and Anas.